Cisco VPN Client on Windows 10
Issues installing Cisco VPN Client on your Windows 10 PC? Follow these steps:
- Install DNE Update from Citrix, selecting your proper platform (either 32 or 64 bits), download from https://www.citrix.com/go/lp/dne.html, direct link for 64 bits version is ftp://ftpsupport.citrix.com/dneupdate64.msi
- Download Cisco VPN Client installer, you can find it here: https://helpdesk.ugent.be/vpn/en/akkoord.php
- Install 7Zip or another compressed EXE tool, you can download it from http://www.7-zip.org/download.html
- Right click on the Cisco VPN installer (vpnclient-winx64-msi-5.0.07.0440-k9.exe), then “Extract to vpnclient-winx64-msi-5.0.07.0440-k9”
- Go into that folder, double click on vpnclient_setup.msi and then do a normal setup.
- When installation finishes, from your Start Menu type ¨regedit¨. We have to fix the VPN adapter’s name. Browse to HKEY_LOCAL_MACHINE\SYSTEM\CurrentControlSet\Services\CVirtA:

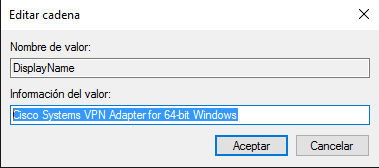
- Double click on DisplayName and remove everything to the left of “Cisco Systems VPN…”, so it’s only “Cisco Systems VPN Adapter for 64-bit Windows”:
- With this last step we are finished and can run the VPN client and connect without any issues.
- If after some Windows updates you can connect to your VPN but can’t see any other devices on your VPN network, just reinstall DNE Update.